In the quickly evolving networking environment, efficient management of routing protocols is essential for reliable and optimized network performance.
Red Hat Ansible Automation Platform is a powerful tool for streamlining repetitive tasks and orchestrating complex network configurations. One crucial aspect of platform-agnostic network management is the management of routing protocols, and in this blog post, we’ll explore how Ansible Automation Platform can be utilized to manage OSPF (Open Shortest Path First), a widely used dynamic routing protocol.
At AnsibleFest 2022 we announced a new form of content included in the platform, called Ansible validated content. We also have detailed blogs on Network Automation with Ansible Validated Content using the network.base collection, and BGP Management with Ansible Validated Content using the network.bgp collection. Now, we are adding a network validated content Collection called network.ospf to manage your OSPF protocols.
OSPF is a widely used dynamic routing protocol, and Ansible Automation Platform can significantly streamline the management of OSPF configurations. In this blog post, we will explore the benefits of managing OSPF with Ansible Automation Platform, including some practical examples of how to automate common OSPF tasks that are part of network management.
Network OSPF use cases
The network.ospf collection acts as core for other Ansible network validated content, as it provides the platform-agnostic role called Resource Manager which is a platform-agnostic entry point to manage all of the resources supported for a given network operating system (OS). In summary, the available options are the following:
- Build Brownfield Inventory. The `persist` operation enables users to get the facts for a given resource and store it as inventory host_vars. The idea is to have this dynamic inventory as a single source of truth for any operation. This is achieved with the help of the `persist` operation.
- Supported Resource Query. The `list` operation enables users to retrieve the list of all resource modules supported for a given network operating system.
- Display Structured Configuration. The `gather` operation enables users to gather and display the facts for specified network resources.
- Deploy Changes. The `deploy` operation enables users to deploy the host vars facts changes on the device. Note that there is another way of pushing a configuration onto the device with the `configure` operation.
- OSPF Health Checks. `health_check` operation enables users to perform health checks for OSPF neighborship. These health checks should provide the OSPF neighborship status with necessary details.
- Detect Drift and Remediate. `detect` operation enables users to find any config differences between the provided configuration and the running configuration; similarly the `remediate` operation allows you to read the facts from GitHub or a local repository and remediate them if any configuration changes appear on the appliances using overridden state.
Let’s deep dive into these operations and see how you can apply them for your network automation.
Using operation persist – Building an Ansible inventory
The `persist` operation enables users to get the OSPFv2, OSPFv3 and OSPF interfaces information in a structured format (JSON) by running configuration facts. The gathered information can be stored as a YAML-formatted host_vars file in a local directory or even published to a remote repository acting as a single source of truth for operations like deploy, remediate, detect, etc.
As an example, this is the native command output for the OSPF neighbors on one of the testing routers we use for this blog:
R1>show ip ospf neighbor

Neighbor ID     Pri   State           Dead Time   Address         Interface
3.3.3.3           1   FULL/BDR        00:00:31    11.0.13.3       GigabitEthernet0/1
2.2.2.2           1   FULL/BDR        00:00:34    10.0.12.2       GigabitEthernet0/0
Let’s save this OSPF configuration as YAML-based host_vars for the inventory. We can write a task as shown below:
---
- hosts: ios
  gather_facts: false
  tasks:
    - name: Network OSPF Management
      ansible.builtin.include_role:
        name: network.ospf.run
      vars:
        operations:
          - name: persist
Execute the Ansible Playbook with the ansible-navigator:
$ ansible-navigator run example.yaml
Here is the new inventory directory structure that was created :
[rothakur@localhost ospf]$ tree ~/network
/home/rothakur/network
└── ospf
    └── host_vars
        └── rtr1
            ├── ospf_interfaces.yaml
            ├── ospfv2.yaml
            └── ospfv3.yaml
In the output we can observe that this Ansible Playbook created files for non-empty results with names similar to resource module names. The content of these files are gathered facts for the resource modules as shown below:
[rothakur@localhost ospf]$ cat ~/network/ospf/host_vars/rtr1/ospfv2.yaml
ospfv2:
    processes:
    -   network:
        -   address: 10.0.12.1
            area: '0'
            wildcard_bits: 0.0.0.0
        -   address: 11.0.13.1
            area: '0'
            wildcard_bits: 0.0.0.0
        process_id: 110
        router_id: 1.1.1.1
    -   process_id: 111
Please note that when running the network.ospf operation for the first time, we specified inventory explicitly and this could result in something similar to what is shown below:
$ cat inventory.yaml
all:
  children:
    rtr1:
      hosts:
        192.168.122.220:
      vars:
        ansible_ssh_user: cisco
        ansible_ssh_pass: cisco
        ansible_connection: ansible.netcommon.network_cli
Using operation deploy – Deploy configuration changes
The `deploy`operation will read the facts from the provided, default or remote inventory and deploy the changes onto the network devices running configuration.
Let’s add max_metric configuration in the ospfv2.yaml file as shown below:
$ cat ~/network/ospf/host_vars/rtr1/ospfv2.yaml
ospfv2:
    processes:
    -   network:
        -   address: 10.0.12.1
            area: '0'
            wildcard_bits: 0.0.0.0
        -   address: 11.0.13.1
            area: '0'
            wildcard_bits: 0.0.0.0
        process_id: 110
        router_id: 1.1.1.1
    -   process_id: 111
        max_metric:
            router_lsa: true
            on_startup:
              time: 120
Now that we have modified the ospfv2 host_vars file, we can use deploy action as shown below:
---
- hosts: rtr1
  gather_facts: false
  tasks:
    - name: Network OSPF Manager
     ansible.builtin.include_role:
       name: network.ospf.run
     vars:
       operations:
         - name: deploy
       data_store:
         local: "~/network/ospf/"
Execute the Ansible Playbook with the ansible-navigator:
$ ansible-navigator run example.yaml
We can confirm these changes on the box with native command as shown below:
R1>show ip ospf max-metric

            OSPF Router with ID (10.1.9.1) (Process ID 111)


		Base Topology (MTID 0)

 Start time: 4w5d, Time elapsed: 23w6d
 Originating router-LSAs with maximum metric
    Condition: on startup for 120 seconds, State: inactive


            OSPF Router with ID (1.1.1.1) (Process ID 110)


		Base Topology (MTID 0)

 Start time: 6d18h, Time elapsed: 27w5d
 Router is not originating router-LSAs with maximum metric
If you want to know more about the tasks executed internally, you can checkout the result.
Using operation gather – Display Structured Configuration
The `gather` operation enables users to gather and display the facts for specified network resources as shown below:
---
- hosts: rtr1
  gather_facts: false
  tasks:
    - name: Network OSPF Manager
     ansible.builtin.include_role:
       name: network.ospf.run
     vars:
       operations:
         - name: gather
Execute the Ansible Playbook with the ansible-navigator command:
$ ansible-navigator run example.yaml
Here is snippet from the output of the gather operation show below:
…
TASK [network.base.resource_manager : Resource Facts] **************************************************************************
ok: [rtr1] => {
    "msg": {
        "ansible_connection": "ansible.netcommon.network_cli",
        "ansible_network_os": "cisco.ios.ios",
        "changed": false,
        "failed": false,
        "gathered": [
            {
                "address_family": [
                    {
                        "afi": "ipv4",
                        "process": {
                            "area_id": "0",
                            "id": 110
                        }
                    }
                ],
                "name": "Loopback27"
            },
…
Notice that the information follows a structured JSON format which is easier to manipulate and process. We can also see the detailed output here.
Using the detect operation – Detect configuration drift
The `detect` operation will read the facts from the provided/default inventory and detect if any configuration changes are there between provided and running configuration:
For example, let’s change start up time to 100 within ospfv2 host_vars in our inventory as shown below.
$ cat ~/network/ospf/host_vars/rtr1/ospfv2.yaml
ospfv2:
    processes:
    -   network:
        -   address: 10.0.12.1
            area: '0'
            wildcard_bits: 0.0.0.0
        -   address: 11.0.13.1
            area: '0'
            wildcard_bits: 0.0.0.0
        process_id: 110
        router_id: 1.1.1.1
    -   process_id: 111
        max_metric:
            router_lsa: true
            on_startup:
              time: 100
…
The detect task can be shown as below:
---
- hosts: rtr1
 gather_facts: false
 tasks:
   - name: Network OSPF Manager
     ansible.builtin.include_role:
       name: network.ospf.run
     vars:
       operations:
         - name: detect
       data_store:
         local: "~/network/ospf/"
Execute the Ansible Playbook with the ansible-navigator:
$ ansible-navigator run example.yaml
Here is snippet from the output of the detect operation, showing the drift between the existing configuration and the source of truth:
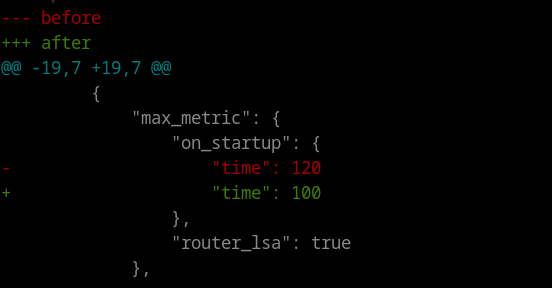
We can also see the detailed output here.
Using the remediate operation – Remediate configuration drift
The `remediate` operation will read the facts from the provided/default inventory and remediate if there are any configuration changes on the network devices. This is done by overriding the running configuration with read facts from the provided/default inventory.
For example, last time we changed start up time for the `detect` operation and now we can actually use the remediate operation to apply those changes as shown here:
- hosts: rtr1
 gather_facts: false
 tasks:
   - name: Network OSPF Manager
     ansible.builtin.include_role:
       name: network.ospf.run
     vars:
       operations:
         - name: remediate
       data_store:
         local: "~/network/ospf/"
Execute the Ansible Playbook with the ansible-navigator:
$ ansible-navigator run example.yaml
Here is snippet from the output of the gather operation:
TASK [network.base.resource_manager : Apply provided configuration] ************
changed: [rtr1] => {
    "after": {
        "processes": [
            {
                "network": [
                    {
                        "address": "10.0.12.1",
                        "area": "0",
                        "wildcard_bits": "0.0.0.0"
                    },
                    {
                        "address": "11.0.13.1",
                        "area": "0",
                        "wildcard_bits": "0.0.0.0"
                    }
                ],
                "process_id": 110,
                "router_id": "1.1.1.1"
            },
            {
                "max_metric": {
                    "on_startup": {
                        "time": 100
                    },
                    "router_lsa": true
                },
                "process_id": 111
            }
        ]
…
We can also see the detailed output here.
Using the health_check operation – Run health checks
The `health_check` operation enables users to perform certain OSPF health-checks as mentioned below.
- all_neighbors_up: This health-check returns `successful` only when all the OSPF neighbors are up and running.
- all_neighbors_down: This health-check returns `successful` only when all the neighbors are down.
- min_neighbors_up: This health-check takes `min_count` as input and returns ‘successful’ only when the minimum number of neighbors are up and running.
- ospf_status_summary: This health-check provides the OSPF status summary.
Here is an Ansible Playbook example of using operation: health_check with all_neighbors_up check and displaying the result:
---
- hosts: rtr1
 gather_facts: false
 tasks:
   - name: Network OSPF Manager
     ansible.builtin.include_role:
       name: network.ospf.run
     vars:
       operations:
         - name: health_check
           vars:
             details: true
             checks:
               - name: all_neighbors_up
               - name: all_neighbors_down
                 ignore_errors: true
               - name: min_neighbors_up
                 min_count: 2
               - name: ospf_status_summary
Execute the Ansible Playbook with the ansible-navigator:
$ ansible-navigator run example.yaml
Here is the result:
TASK [network.ospf.run : OSPF health checks] **************************************************************************
ok: [rtr1] => {
    "failed_when_result": false,
    "health_checks": {
        "all_neighbors_down": {
            "check_status": "unsuccessful",
            "details": {
                "neighbors": []
            },
            "down": 0,
            "total": 2,
            "up": 2
        },


…
Please note that the performed health checks `all_neighbors_up` have passed. It passed because there were a total of two OSPF neighbors and both were in FULL/BDR state.
We also performed a `min_neighbors_up` health-check where we wanted some minimum number of neighbors in the established state. With these health checks, we have also used the `details` variable to get more details about the OSPF neighborship state.
The reason our health check task passed successfully, even though `all_neighbors_down` was unsuccessful, is because we used `ignore_errors` as `true`.
Takeaways & next steps
As shown above, with the help of the network OSPF Ansible validated content, we can enhance the experience of resource module consumption by providing production-ready content. By using the persist, gather , detect, remediate and deploy operations, network engineers can gain much more flexibility and adopt platform network OSPF automation. We can also perform health checks on OSPF neighborship with the health_check operations.
If you want to learn more about Ansible Automation Platform and network automation, you can check out these resources:
- Learn about network.base validated content collection
- Network Automation Guide
- Network automation free hands-on self-paced labs
- Network Automation web page
- Overview of Ansible’s integration with third party networking solution
![]()
Originally posted on Ansible Blog
Author: Rohit Thakur