The author selected the FreeBSD Foundation to receive a donation as part of the Write for DOnations program.
How To Write Unit Tests in Go Using go test and the testing Package
Introduction
A unit test is a function that tests a specific piece of code from a program or package. The job of unit tests is to check the correctness of an application, and they are a crucial part of the Go programming language.
In this tutorial, you will create a small program and then run a series of tests on your code using Go’s testing package and the go test command. Once you complete the tutorial, you will have a working unit-testing suite that includes a table-based unit test, a coverage test, a benchmark, and a documented example.
Prerequisites
To complete this tutorial, you’ll need the following:
-
A familiarity with the Go programming language. Visit our tutorial series/ebook, How To Code in Go, for a broad introduction to the language.
-
Go Version 1.11 or higher installed on your local machine. You can follow these instructions to install Go on Linux, macOS and Windows. On macOS, you can also install Go using the Homebrew package manager.
Note: This tutorial uses Go Modules, which is a package management system introduced in Go version 1.11. Go Modules are intended to replace the $GOPATH and became the default option starting with Go version 1.13. For a more comprehensive overview of the differences between Go Modules and the $GOPATH, consider reading this official blog post from the Go core team.
This tutorial was tested using Go version 1.14
Step 1 — Creating a Sample Program to Unit Test
Before you can write any unit tests, you need some code for your tests to analyze. In this step, you will build a small program that sums two integers. In the subsequent steps, you will use go test to test the program.
First, create a new directory called math:
- mkdir ./math
Move inside the new directory:
- cd ./math
This will be the root directory for your program, and you will run all remaining commands from here.
Now, using nano or your preferred text editor, create a new file called math.go:
- nano math.go
Add the following code:
package math

// Add is our function that sums two integers
func Add(x, y int) (res int) {
    return x + y
}

// Subtract subtracts two integers
func Subtract(x, y int) (res int) {
    return x - y
}
Here you are creating two functions called Add and Subtract. Each function accepts two integers and returns either their sum (func Add) or their difference (func Subtract).
Save and close the file.
In this step, you wrote some code in Go. Now, in the following steps, you will write some unit tests to ensure that your code functions properly.
Step 2 — Writing Unit Tests in Go
In this step, you will write your first test in Go. Writing tests in Go requires a test file link, and this test file must always end with _test.go. By convention, Go testing files are always located in the same folder, or package, where the code they are testing resides. These files are not built by the compiler when you run the go build command, so you needn’t worry about them ending up in deployments.
And as with everything in Go, the language is opinionated about testing. The Go language provides a minimal yet complete package called testing that developers use alongside the go test command. The testing package provides some useful conventions, such as coverage tests and benchmarks, which you will now explore.
Use your editor to create and open a new file called math_test.go:
- nano math_test.go
A test function in Go includes this signature: func TestXxxx(t *testing.T). This means that all test functions must start with the word Test, followed by a suffix whose first word is capitalized. Test functions in Go receive only one parameter, and in this case, it’s a pointer of type testing.T. This type contains useful methods that you will need to output results, log errors to the screen, and signal failures, like the t.Errorf() method.
Add the following code to math_test.go:
package math

import "testing"

func TestAdd(t *testing.T){

    got := Add(4, 6)
    want := 10

    if got != want {
        t.Errorf("got %q, wanted %q", got, want)
    }
}
First, you declare the name of the package that you want to test—math. Then you import the testing package itself, which then makes available the testing.T type and the other types and methods exported by the package. The code and testing logic is contained in the TestAdd function.
To summarize, the following are characteristics of a test in Go:
- The first and only parameter must be
t *testing.T - The testing function begins with the word
Testfollowed by a word or phrase that starts with a capital letter (the convention is to use the name of the method under test, e.g.,TestAdd) - The test calls
t.Errorort.Failto indicate a failure (you are callingt.Errorbecause it returns more detail thant.Fail) - You can use
t.Logto provide non-failing debug information - Tests are saved in files using this naming convention:
foo_test.go, such asmath_test.go.
Save and then close the file.
In this step, you wrote your first test in Go. In the next step, you will begin using go test to test your code.
Step 3 — Testing Your Go Code Using the go test command
In this step, you will test your code. go test is a powerful subcommand that helps you automate your tests. go test accepts different flags that can configure the tests you wish to run, how much verbosity the tests return, and more.
From your project’s root directory, run your first test:
- go test
You will receive the following output:
OutputPASS
ok      ./math 0.988s
PASS means the code is working as expected. When a test fails, you will see FAIL.
The go test subcommand only looks for files with the _test.go suffix. go test then scans those file(s) for special functions including func TestXxx and several others that we will cover in later steps. go test then generates a temporary main package that calls these functions in the proper way, builds and runs them, reports the results, and finally cleans everything up.
Our go test is probably sufficient for our little program, but there will be times when you’ll wish to see what tests are running and how long each takes. Adding the -v flag increases verbosity. Rerun your test with the new flag:
- go test -v
You will see the following output:
Output=== RUN   TestAdd
--- PASS: TestAdd (0.00s)
PASS
ok      ./math 1.410s
In this step, you ran a basic unit test using the go test subcommand. In the next step, you will write a more complex, table-driven unit test.
Step 4 — Writing Table-Driven Tests in Go
A table-driven test is like a basic unit test except that it maintains a table of different values and results. The testing suite iterates over these values and submits them to the test code. Using this approach, we get to test several combinations of inputs and their respective output.
You will now replace your unit test with a table of structs, whose fields include the necessary two arguments (two integers) and the expected result (their sum) for your Add function.
Reopen math_test.go:
- nano math_test.go
Delete all the code in the file and add the following table-driven unit test instead:
package math

import "testing"

// arg1 means argument 1 and arg2 means argument 2, and the expected stands for the 'result we expect'
type addTest struct {
    arg1, arg2, expected int
}

var addTests = []addTest{
    addTest{2, 3, 5},
    addTest{4, 8, 12},
    addTest{6, 9, 15},
    addTest{3, 10, 13},

}


func TestAdd(t *testing.T){

    for _, test := range addTests{
        if output := Add(test.arg1, test.arg2); output != test.expected {
            t.Errorf("Output %q not equal to expected %q", output, test.expected)
        }
    }
}
Here you are defining a struct, populating a table of structs that include the arguments and expected results for your Add function, and then writing a new TestAdd function. In this new function, you iterate over the table, run the arguments, compare the outputs to each expected result, and then returning any errors, should they occur.
Save and close the file.
Now run the test with the -v flag:
- go test -v
You will see the same output as before:
Output=== RUN   TestAdd
--- PASS: TestAdd (0.00s)
PASS
ok      ./math 1.712s
With each iteration of the loop, the code tests the value calculated by the Add function against an expected value.
In this step, you wrote a table-driven test. In the next step, you will write a coverage test instead.
Step 5 — Writing Coverage Tests in Go
In this step, you will write a coverage test in Go. When writing tests, it is often important to know how much of your actual code the tests cover. This is generally referred to as coverage. This is also why you have not written a test for your Subtract function — so we can view an incomplete coverage test.
Run the following command to calculate the coverage for your current unit test:
- go test -coverprofile=coverage.out
You will receive the following output:
OutputPASS
coverage: 50.0% of statements
ok      ./math 2.073s
Go saved this coverage data in the file coverage.out. Now you can present the results in a web browser.
Run the following command:
- go tool cover -html=coverage.out
A web browser will open, and your results will render:
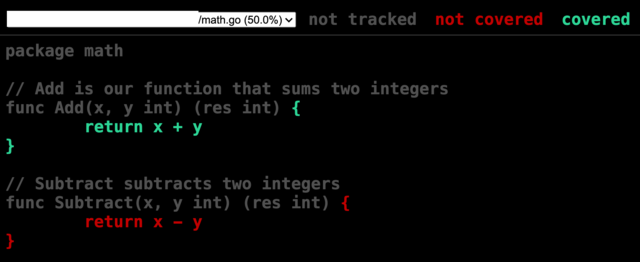
The green text indicates coverage, whereas the red text indicates the opposite.
In this step, you tested the coverage of your table-driven unit test. In the next step, you will benchmark your function.
Step 6 — Writing Benchmarks in Go
In this step, you will write a benchmark test in Go. Benchmarking measures the performance of a function or program. This allows you to compare implementations and to understand the impact of the changes you make to your code. Using that information, you can reveal parts of your Go source code worth optimizing.
In Go, functions that take the form func BenchmarkXxx(*testing.B) are considered benchmarks. go test will execute these benchmarks when you provide the -bench flag. Benchmarks are run sequentially.
Let’s add a benchmark to our unit test.
Open math_test.go:
- nano math_test.go
Now add a benchamrk function using the func BenchmarkXxx(*testing.B) syntax:
...
func BenchmarkAdd(b *testing.B){
    for i :=0; i < b.N ; i++{
        Add(4, 6)
    }
}
The benchmark function must run the target code b.N times, where N is an integer that can be adjusted. During benchmark execution, b.N is adjusted until the benchmark function lasts long enough to be timed reliably. The --bench flag accepts its arguments in the form of a regular expression.
Save and close the file.
Now let’s use go test again to run our benchmark:
- go test -bench=.
The . will match every benchmark function in a file.
You can also declare benchmark functions explicitly:
- go test -bench=Add
Run either command, and you will see an output like this:
Outputgoos: windows
goarch: amd64
pkg: math
BenchmarkAdd-4          1000000000               1.07 ns/op
PASS
ok      ./math 2.074s
The resulting output means that the loop ran 10,000,000 times at a speed of 1.07 nanosecond per loop.
Note: Try not to benchmark your Go code on a busy system being used for other purposes, or else you will interfere with the benchmarking process and get inaccurate results
You have now added a benchmark to your growing unit test. In the next and final step, you will add examples to your documentation, which go test will also evaluate.
Step 7 — Documenting Your Go Code with Examples
In this step, you will document your Go code with examples and then test those examples. Go is very focused on proper documentation, and example code adds another dimension both to documentation and testing. Examples are based on existing methods and functions. Your examples should show users how to use a specific piece of code. Example functions are the third type of function treated specially by the go test subcommand.
To begin, reopen math_test.go,
- nano math_test.go
Now add the highlighted code. This will add the fmt package to the import list and your example function at the end of the file:
package math

import (
    "fmt"
    "testing"
)

// arg1 means argument 1 and arg2 means argument 2, and the expected stands for the 'result we expect'
type addTest struct {
    arg1, arg2, expected int
}

var addTests = []addTest{
    addTest{2, 3, 5},
    addTest{4, 8, 12},
    addTest{6, 9, 15},
    addTest{3, 10, 13},
}

func TestAdd(t *testing.T) {

    for _, test := range addTests {
        if output := Add(test.arg1, test.arg2); output != test.expected {
            t.Errorf("Output %q not equal to expected %q", output, test.expected)
        }
    }
}

func BenchmarkAdd(b *testing.B) {
    for i := 0; i < b.N; i++ {
        Add(4, 6)
    }
}


func ExampleAdd() {
    fmt.Println(Add(4, 6))
    // Output: 10
}
The Output: line is used to specify and document the expected output.
Note: The comparison ignores leading and trailing space.
Save and close the file.
Now rerun your unit test:
- go test -v
You will see an updated outout like this:
Output=== RUN   TestAdd
--- PASS: TestAdd (0.00s)
=== RUN   ExampleAdd
--- PASS: ExampleAdd (0.00s)
PASS
ok      ./math   0.442s
Your examples are now also tested. This feature improves your documentation and also makes your unit test more robust.
Conclusion
In this tutorial, you created a small program and then wrote a basic unit test to check its functionality. You then rewrote your unit test as a table-based unit test and then added a coverage test, a benchmark, and a documented example.
Taking time to write adequate unit tests is useful to you as a programmer because it improves your confidence that the code or program you have written will continue to work as expected. The testing package in Go provides you with considerable unit-testing capabilities. To learn more, refer to Go’s official documentation.
And if you wish to learn more about programming in Go, visit our tutorial series / free ebook, How To Code in Go.
Originally posted on DigitalOcean Community Tutorials
Author: Tobi Balogun